The Playback display options in a Nikon DSLR camera is a series of screens you can choose to display for each image. You know how you view pictures on the camera’s monitor by scrolling left and right with the Multi selector rocker switch on the camera’s back?
Well, to use the screens mentioned in this series, you first have to enable them, and then you can scroll up or down (instead of left or right) with the Multi selector to see each of the available Playback display options screens. The individual screens have valuable information about the image being displayed.
Using the Nikon D7100 as an example (other Nikons are similar), here is a short excerpt from the NikoniansPress book Mastering the Nikon D7100:
Playback Display Options
The Playback display options selection allows you to customize how the D7100 displays several histogram and data screens for each image. You get to those screens by displaying an image on the camera’s Monitor and scrolling up or down with the Multi selector.
When you want to see a lot of detailed information about each image, you can select it here. Or, if you would rather take a minimalist approach to image information, simply turn off some of the screens. The None screen is the ultimate minimalist screen because it displays nothing except the image itself with no information overlays.
If you turn off certain screens, the camera still records the information for each image, such as lens used, shutter speed, and aperture. However, with no data screens selected, you’ll see only two screens when you scroll up or down. One is the main image view, and the other is a summary screen with a luminance histogram and basic shooting information. Those two screens are the basic image display screens, and they cannot be disabled.
You get to the additional screens by using the Multi selector to scroll vertically. I leave my camera set so I can scroll through my images by pressing left or right on the Multi selector. Then I can scroll through the data screens by scrolling up or down with the Multi selector.
Following are the photo information choices in the Playback display options menu:
Basic photo info
- Focus point
Detailed photo info
- None
- Highlights
- RGB histogram
- Data
- Overview
When you modify these selections, be sure to scroll up to Done and press the OK button to save your settings (figure 2.8, screen 3).

Figure 2.8 – Selecting Playback display options photo info
Use the following steps to enable or disable any of the five Playback display options screens:
- Select Playback display options from the Playback Menu and scroll to the right (figure 2.8, screen 1).
- Choose any of the six available screens by highlighting an option with the Multi selector and scrolling to the right to put a check mark in the box for that item (figure 2.8, screen 2).
- After you have check marks in all the boxes for the screens you want to use, simply press the OK button to save your selections.
Now, let’s look at what each of these selections accomplishes (figures 2.9 to 2.12.1).
Focus Point
If you are curious about which autofocus (AF) point was focused on your subject during an exposure, use this mode to easily find out. If you used Single-point AF or Dynamic-area AF, you’ll see a single red AF indicator where the camera was focused when you took the picture.
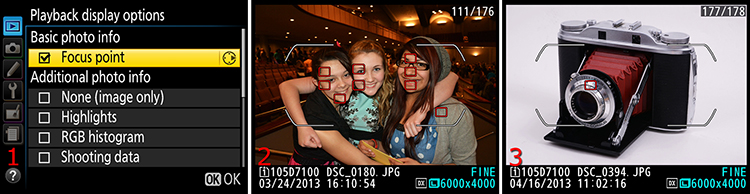
Figure 2.9 – Enabling the Focus point display
Focus point is a useful function for reviewing how the camera’s AF system performs in different imaging situations. If you are using Auto-area AF you’ll see several red focus points that provided AF in your image (figure 2.9, screen 2). If you were using Single-point AF, Dynamic-area AF, or 3D-Tracking, you will see only one red focus point. In figure 2.9, screen 3, you can see the red focus point on the rim of the antique camera’s lens. (We will discuss AF-area modes in detail in the chapter titled Autofocus, AF-Area, and Release Modes.)
None (Image Only)
This setting is designed to give you a somewhat larger view of the current image, using the majority of the available Monitor screen space to show the image (figure 2.9.1, screen 2). There are no text overlays, just the image by itself. This is a good selection for when you want to more easily evaluate an image and zoom in to look at details.
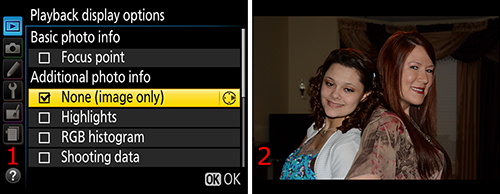
Figure 2.9.1 – Enabling the None (image only) display
Since only the image itself is displayed, it is easier to scroll around within it when you use the camera’s two zoom buttons (Playback zoom in and out). You can zoom all the way in to 38x the normal image view. There is a tremendous level of detail buried inside each 24.1 MP image.
Highlights
If you put a check mark next to the Highlights selection, as shown in figure 2.10, screen 1, you will turn on what I call the blink mode. You’ll see the words RGB Highlights at the bottom left of the image (figure 2.10, screens 2 and 3).

Figure 2.10 – Enabling the Highlights display (blinks white to black and repeats)
When you have Highlights enabled and you see a blinking white and black area in an image on the Monitor, it means that particular area of the image has turned completely white and lost all detail, or has blown out (become too bright). Of course, there is no way to display a blinking image in a printed book, so screens 2 and 3 in figure 2.10 represent the white and black blinks, respectively. You can see the overexposed background at the red arrows in figure 2.10, images 2 and 3. Image 3 clearly shows the overexposed area in black. Additionally, the letters RGB, at the bottom left of the Monitor, will be highlighted in yellow and will blink. You will need to use exposure compensation or manually control the camera to contain the exposure within the dynamic range of the camera’s sensor.
If you examine the histogram on the Overview screen for our example image of a 1963 Nikkorex SLR, you will note that it is an overexposed image. You can see that the luminance histogram is just beginning to be cut off, or clipped, on the right side (red arrow in figure 2.10.1). This image is somewhat overexposed around the sides and top of the image, where the black shows in figure 2.10, image 3.

Figure 2.10.1 – Histogram is clipped on the highlight side
Current software cannot usually recover much, if any, image data from the blown-out sections. The exposure has exceeded the brightness range of the sensor and has become completely overexposed in the blinking area. We will discuss how to deal with images that have light ranges exceeding the sensor’s recording capacity in the chapter called Metering, Exposure Modes, and Histogram.
Highlights mode conveniently warns you when you have surpassed what the sensor can capture and lets you know that portions of the image are overexposed.
Note: You should learn to use the histogram on your camera! In my opinion, it is as important as the exposure meter. It will inform you when you have over- or underexposed part or all of your image. If you faithfully evaluate your images with the histogram immediately after you take them, you will be able to judge when an image is correctly exposed and will come away with the best exposures you have ever made.
In the next section we will consider how to enable and use the histogram screens on your camera.
RGB Histogram
A histogram is a digital readout that shows the range of light and color in an image. If there is too much contrast, the histogram will be cut off. We’ll examine the histogram in great detail later. For now, let’s take a quick look at the screen that will appear if you turn this feature on.

Figure 2.11 – Enabling the RGB histogram display
I like this feature because it allows me to view not just a basic luminance (brightness) histogram like on the overview screen in figure 2.10.1, but all three color (chrominance) histograms—red, green, and blue (RGB)—and a luminance histogram on one screen (figure 2.11). The D7100 stacks the four histograms on the right side of the screen, with the luminance histogram on top (white) and the RGB color histograms underneath.
It is quite useful to see each color channel in its own histogram since it is possible to overexpose, or blow out, only one color channel. For instance, notice how the blue channel histogram is more clipped than the others. This image has blown out (clipped) the blue channel on the right (brightness) side, while the green and red channels are still displaying most of their data (not clipped). If we had only looked at the luminance (white) histogram, it may look as though the image is not all that overexposed, even though the Highlights mode is blinking black on a sizable section of the image (figure 2.10, image 3). This clearly shows the usefulness of the RGB histograms for determining which RGB channel is causing the overexposure condition.
The luminance histogram is usually very similar to the green channel histogram because green is the most common color.
Shooting Data
This setting will give you up to four additional image data screens to scroll through; each contains quite a bit of detail (metadata) about the image. These screens overlay a dim version of the actual picture they represent.
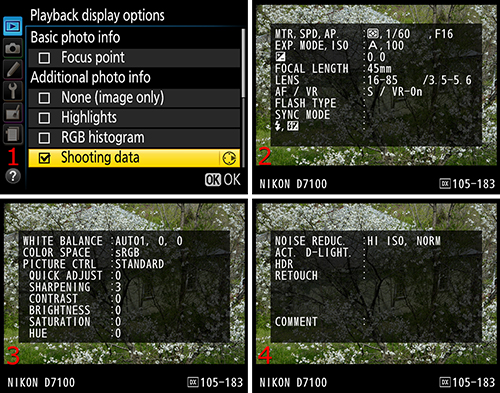
Figure 2.12 – Enabling the Shooting data display
The data on these screens includes the following information (figure 2.12):
Shooting data, first screen (figure 2.12, screen 2)
- Light meter in use (Matrix, Spot, or Averaging), Shutter speed, and Aperture
- Exposure (shooting) mode (P, S, A, M) and ISO sensitivity
- Exposure compensation value and exposure tuning (if used)
- Focal length (e.g., 55mm)
- Lens overview (e.g., 24–85mm f/3.5–4.5)
- Focus mode (AF) and vibration reduction (VR) settings
- Flash type (e.g., Auto, Slow sync, Red-eye reduction, Fill flash) and Commander mode (e.g., CMD)
- Flash control and compensation (e.g., M:TTL +0.7)
Shooting data, second screen (figure 2.12, screen 3)
- White balance (e.g., Color temp, fine tuning, PRE)
- Color space (sRGB, AdobeRGB)
- Picture control detail (e.g., Neutral, Standard, Vivid)
- Quick adjust, Sharpening, Contrast, Brightness, Saturation, and Hue
Shooting data, third screen (figure 2.12, screen 4)
- Noise reduction (High ISO NR and Long exposure NR)
- Active D-Lighting (Off, Low, Normal, High, Extra high, Auto)
- HDR exposure differential and smoothing settings (e.g., Auto, High)
- Retouch history (e.g., D-Lighting, Warm filter, Trim)
- Image Comment (you can add up to 36 characters)
- Overview
The Overview screen is a very useful condensation of the most important shooting information, all in one place (figure 2.12.1, screen 2). Additionally, it shows a thumbnail of the image and a luminance histogram readout.

Figure 2.12.1 – Enabling the Overview display
You may not realize that the Overview screen is selectable because it does not show on the Monitor unless you scroll down on the Playback display options screen. It is directly below the Shooting data selection on the menu.
Note: If you take a picture with a GPS unit attached and active on your D7100, such as the Nikon GP-1 GPS, you’ll have an additional screen available—even if you don’t have any other Shooting data screens selected.
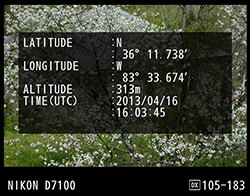
Figure 2.12.2 – The GPS display
Figure 2.12.2 shows the GPS screen. The GPS data screen shows Latitude, Longitude, Altitude, and Time (UTC). The GPS screen is not controlled by the Playback display options setting. It will appear if a GPS was mounted at the time you took a picture. It will not appear if no GPS was active.
Those are a lot of screens to scroll through, but they provide a great deal of information about the image. Look how far we’ve come from the days when cameras wrote date information on the lower right of the image (permanently marking it) or between the frames on pro-level cameras.

Figure 2.13 – This basic display screen is always available
Including the basic display screen—which cannot be disabled—shown in figure 2.13, there are eight screens just brimming with data on the D7100—plus a ninth screen, the GPS screen, if a GPS unit is mounted. When you have the Focus point selection enabled, it overlays the basic display screen.
Settings Recommendation: I always leave the Highlights (figure 2.10) and RGB histogram (figure 2.11) displays turned on because I want to confirm that I’m not accidentally blowing out important sections of my image. The Highlights blink mode warns me when my images have overexposed areas, allowing me to adjust my exposure and reshoot the image. The RGB histogram allows me to see all the color channels in case one of them is clipped off on the light or dark sides. It also allows me to see how well I am keeping my exposure balanced for light and dark. The Shooting data screens are not very important to me because I use the Overview screen (figure 2.11.1, screen 2) with only the most important exposure information displayed. Also, if I enable the Shooting data screens, I just have to scroll through three more screens to get to my RGB histogram screen.
Keep on capturing time…
Darrell Young

Darrell Young is an active member of the Nikonians User Community, Nikon Professional Services (NPS), Professional Photographers of America (PPA), North American Nature Photography Association (NANPA), and the author of 18 photography books from NikoniansPress and Picture and Pen Press, through Rocky Nook. You may review a few of Darrell’s books here. He has been an avid photographer since 1968 when his mother gave him a Brownie Hawkeye camera. Here is one of Darrell’s nature image portfolios.
His website, www.PictureAndPen.com, was created to support the readers of his educational books, photography students, and clients. Visitors to his website will find articles and reviews designed to inform, teach, and help you enjoy your photographic journey.
hi Great site by the way, very useful.
Quick question which I hope you can help with, on your D810, in playback mode highlights screen, do the yellow RGB letters blink all the time regardless of whether or not the image displays overexposed blinkies? Or is there a fault with my D810?
Cheers
Great help! Thank you for the direct to the point help. You are the best!!!!!
Hello Darrell;
I have done something that I am unable to see the photo in full on display screen. It is every other way to view it. I have a Nikon 7100 camera. Do you know what I may have set by accident and would like to just have the full photo in playback mode with the full screen..
Thanks so much
Thank you for the simple explanations. A qstn on Nikon D810: after shooting a picture, how does one make the camera display the image till you have read all the data. Default setting is nothing but annoying because the image vanishes in a few seconds in the interest of saving battery charge!
I use a Nikon D3200. While clicking the picture I have to look through the eyepiece, the subject doesn’t show up on my screen. Is there something wrong with my camera or can I change the setting?
But this is not working in my Nikon d5500. How to fix this..pls help…
Did you get your screen back online?
If so how did you get it done.? My D5500 has done the same thing.
Did you solved it?
Hello,
I read this page it was very helpful. I was given a Nikon D60. I downloaded the manual however I can not seem to find…. (when I tap before pressing down to take the picture, there is no preview of what your taking the picture of.) I am shooting blind. Any help would be greatly appreciated!
Thank you
So helpful, thank you!
Very useful, especially for me the blown highlights screen and information. Just getting away from daylight and into strobe / flash photography and I like to set manual settings, so it is great to see the blown highlights instantly so I can turn the flash down or move it back a little etc.
Hey i would like to ask you, i don’t like on my D810 that when i take the picture in order to view it i have to push play button, is there any settings that will allow me to see the image automatically on display after taking it. Thank you?
Basic shooting data is showing on my photos. I don’t want this and cannot seem to find where to turn it of. Shows: Nikon d5600 and whatever the photo settings the pic was taken.
Hi, I’ve a yellow tint on the display screen and also on all the images. Is that a defect or do have to change the setting. It is a brand new Nikon d5200. Any help is much appreciated. Thank you.
Hi Darrell, do you think or have you heard of any rumors if Nikon will EVER get a grid view during playback. I utilize the grid view all the time in the viewfinder, but for certain architecture subjects it would be nice to see it again for reference on playback. This is something that the “other guys” are doing, but Nikon seems to not feel it’s very important. Do you have any insight into why this is? Thanks so much. Cheers!
I have a new Nikon 5600 DSL are. How do I adjust the screen so it does not keep turning off so quickly?
help wanted please!!
camera: Nikon d5300
problem: How do i get the screen back again after it goes blank when ic clicked the OK button while viewing photos on playback?
New to Nikon. It drove me nuts when I saw the overlay of where my focus was and it was as simple as the up and/or down button.
Definitely bookmarking this page! Helped me a lot! Thank you!!!
Love your Immense level of knowledge! Is there a button can press on my D5600 to display my settings for an individual picture (with my Android phone I just swipe up to reveal the EXIF info. Thanks
Will a picture save if none of the playback display options are checked. Somehow camera (D5300) seems to have lost setting along the way and whilst while you shoot I can see the image for a few seconds, I cannot find any of the images taken on camera when I try downloading over WI-FI.
Daryll,
When are you going to write a “Mastering..” book on the Z9?