The human eye and brain can adjust to virtually any lighting situation.
Let’s say you’re reading a book with an old fashioned incandescent light bulb in your lamp. You probably won’t notice that the normally white pages of your book have a warm orange tint. Your brain adjusts your color perception so that the pages of the book look white to your eye. If you take your book outside and sit under a tree in the shade, the color of the light is now a cool bluish. Yet, your eye keeps right on perceiving the book’s page as white.
Every light source has a different color. If you’re taking pictures in direct sunlight, and suddenly a cloud’s shadow covers your subject, there is a difference in the color of the light. It’s called the “color temperature” of the light. Your brain adjusts automatically to different color temperatures and you see everything with normal colors, no matter what the light source.
Unfortunately, a camera does not have the power of your brain. A Nikon DSLR has an Auto White Balance setting that does its best to adjust to the current lighting color temperature. It does a good job most of the time. However, sometimes it needs a little help, especially when you want very consistent results from image to image.
It will benefit your photography significantly to understand how the White Balance (WB) features of your camera operate.
How does White Balance Work?
Normally, the WB settings are used to adjust the camera so that whites are truly white and other colors are accurate under whatever light source you are shooting. You can also use the White Balance controls to deliberately introduce color casts into your image for interesting special effects.
Camera WB color temperatures are exactly backwards from the Kelvin scale we learned in school for star temperatures. Remember that a red giant star is “cool,” while a blue/white star is “hot.” The WB color temperatures are backwards because the camera’s WB system is adding color to make up for a deficit of color in the original light of the subject. For instance, under a fluorescent light, there is a deficit of blue, which makes the image appear greenish-yellow. By adding blue, the image is balanced to a more normal appearance.
Another example might be shooting on a cloudy overcast day. The ambient light could cause the image to look bluish if left unadjusted. The auto WB control in your camera sees the “cool” color temperature and adds some red to “warm” the colors a bit. Normal camera WB on a cloudy overcast day might be about 6000K.
Just remember that we use the real Kelvin temperature range in reverse and that warm colors are considered reddish while blue colors are cool. Even though this is backwards from what we were taught in school, it fits our situation better. Blue seems cool while red seems warm to photographers! Just don’t let your astronomer friends convince you otherwise.
Main point: Understanding WB in a simplified way is simply realizing that light has a range of colors that go from cool to warm. We can adjust our cameras to use the available light in an accurate, neutral, “balanced” way that matches the actual light source, or allow a color cast to enter the image by unbalancing the settings.
Color Temperature
The WB range, as allowed by the camera, can vary from a very cool 2500K to a very warm 10000K in most Nikon® DSLRs (may vary). In Figure 1 is the same picture adjusted in Photoshop® to three WB settings manually; 2500K, 5000K, and 10000K.
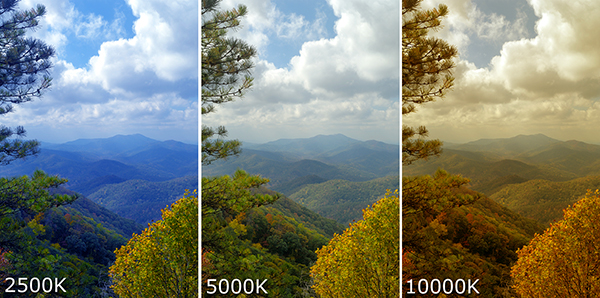
Figure 1 – Same image with different WB settings
Notice how the 2500K image is much bluer or cooler than the 10000K image. The 5000K image is about right for the picture’s actual daylight. The 10000K image is much too warm.
In the “good old” film days, many of us used daylight balanced film and an 81A filter to warm up our subjects. Or we might add a filter to put some blue in on a foggy day to make the image feel cold and foreboding. You can get the same results with the hard coded white balance settings built-in to the camera.
To achieve the same effect as daylight film and a warming filter, simply select the “Cloudy” white balance setting while shooting in normal daylight. This sets the camera to balance at about 6000K and make nice warm-looking images. If you want to really warm the image up, set the controls to “Shade” which sets the camera to 8000K.
On the other hand, if you want to make the image appear cool or bluish, try using the Fluorescent (4200K) or Incandescent (3000K) settings in normal daylight.
Remember, the color temperature shifts from “cool” values to “warm” values. The camera can record your images with any color temperature from 2500K (very cool or bluish) to 10000K (very warm or reddish) and any major value in between. There’s no need to carry different film emulsions or filters to deal with light color range. The camera has very easy to use color temperature controls, and a full range of color temperatures available.
Should I Worry About White Balance if I Shoot in RAW Mode?
The quick answer is no, but maybe not the best answer. When you take a picture using RAW mode (creating .NEF files) the sensor image data has no WB, sharpening, or color saturation information applied. Instead, the information about your camera settings is stored as “markers” along with the raw black & white sensor data. Color information is only applied permanently to the image when you post-process and save the image in another format, like JPG, TIF, or EPS.
When you open the image in Nikon Capture NX 2, or another raw conversion program, the camera settings are applied to the sensor data in a temporary way so that you can view the image on your computer screen. If you don’t like the color balance or any other setting you used in-camera, you simply change it in the conversion software, and the image looks as if you used the new settings originally when you took the picture.
Does that mean you shouldn’t be concerned about WB settings if you shoot RAW most of the time? No. As mentioned at the beginning of this chapter, the human brain can quickly adjust to an image’s colors and perceive them as normal, even when they are not? That’s one of the dangers of not using correct WB. Since an unbalanced image on-screen is not compared to another correctly balanced image side-by-side, there is a danger that your brain may accept the slightly incorrect camera settings as normal, and your image will be saved with a color cast.
Use your WB correctly at all times and you’ll make better images for it. You’ll do less post camera work if the WB is correct in the first place. As RAW shooters, we already have a lot of post-processing work to do on our images. Why add WB corrections to the work flow?
Additionally, you might decide to switch to JPEG mode in the middle of a shoot, and if you are not accustomed to using your WB controls, you will be in trouble. When you shoot JPEGs, your camera will apply the WB information directly to the image, and save it on your card…permanently. Be safe—always use good WB technique!
Setting White Balance in the Shooting Menu
This method let’s you manually select the WB color temperature by using the shooting Menu screens. You can open up White balance on the Shooting Menu and set the color temperature by selecting from a list of preset values or by setting it to Auto (default) for camera selected white balance values.
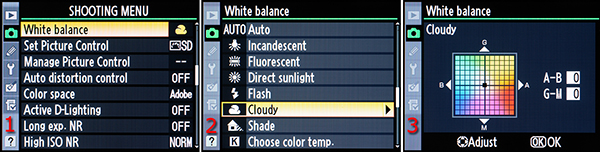
Figure 2 – Manual white balance with Shooting Menu screens
Here are the screens and steps used to select a White balance setting:
- Select White balance from the Shooting Menu and scroll to the right (see figure 2, image 1).
- Select one of the preset values, such as Flash or Cloudy, and scroll to the right (see figure 2, image 2).
- Press the OK button immediately, without moving the little black square from its center position in the color box—unless you want to fine tune the white balance setting (see figure 2, image 3).
Normally you’ll use only the first two screens in figure 2 to select one of the preset WB values, such as Cloudy, Shade, or Direct sunlight. Then you’ll just press the OK button on the final screen, without changing anything. Or, you can use the third screen in figure 2 to manually fine tune the white balance. Unless you are a really finicky person you probably should just press the OK button in the second screen of figure 2 and bypass the fine tuning process.
If you choose to fine-tune any of the color temperature settings after you have selected one of the preset WB values, the color box in the last screen of figure 2 allows you to do so by mired clicks. Each press of the Multi Selector in a given direction is equal to five mired* in that direction—up is green (G), down is magenta (M), left is blue (B), right is amber (A). (* Note: One “mired” is a barely perceptible change in color).
If you aren’t familiar with adjusting the preset’s default color temperature, or don’t want to change it (most won’t), then simply press the OK button without moving the little square from the center. If you’ve accidentally moved it, simply move it back with the Multi Selector until it’s in the middle again, then press the OK button. That will select the preset WB value without modifying its default value (see Method 1 for a list of the preset WB default values).
Note: The Fluorescent selection allows you to choose one of seven different light sources, covering a wide spectrum. It has an additional screen, as shown in figure 3.
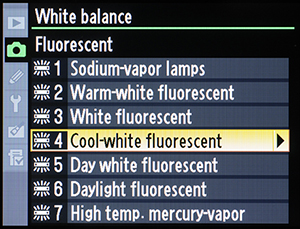
Figure 3 – Fluorescent’s seven selections
You’ll need to experiment and see which fluorescent source matches yours. It may be best to do an ambient “PRE” reading using a gray card. My Mastering the Nikon DSLR books explain how in the chapter dedicated to White Balance. In fact, the most accurate form of white balance is using a white or gray card to do a WB reading in the ambient light bathing your subject. Let’s consider a few tips and tricks for ambient light readings.
White Balance Tips and Tricks
Tips for using a white/gray card: When measuring WB with a gray or white card keep in mind that your camera does not need to focus on the card. In PRE mode, it will not focus anyway, since it is only trying to read light values, not take a picture. The important thing is to put your lens close enough to the card to prevent it from seeing anything other than the card. Three or four inches (about 100mm) away from the card is about right for most lenses.
Also, be careful that the source light is not casting a shadow from the lens onto the card in a way that lets your lens see some of the shadow. This will make the measurement less accurate. Also, be sure that your source light does not make a glare on the card. That is a little harder to do since the card has a matte surface, but it still can be done. You may want to hold the card at a slight angle to the source light if it is particularly bright and might cause glare.
Finally, when the light is dim, use the white side of the card since it has more reflectivity. This may prevent a bad reading in low light. The gray card may be more accurate for color balancing, but might be a little dark for a good measurement in dim light. If you are shooting in normal light the gray card is best for balancing. I doubt it makes a lot of difference, however; you might want to experiment in normal light with your camera and see which you prefer.
Learn to use your White Balance controls for complete and consistent color control in your most important images.
Keep on capturing time…
Darrell Young
See my Nikon books here:
http://www.PictureAndPen.com/NikonBooks.asp
This is an excellent article. Very concise and informative.