The Auto ISO Sensitivity Control (ISO-AUTO), found under the Shooting Menu under ISO sensitivity settings, is a powerful feature in many Nikon DSLR cameras. It’s allows the camera to automatically control the ISO sensitivity, according to the light levels sensed by the camera. It’s very helpful when you don’t have time to deal with exposure issues—yet must get the pictures. Many photojournalists love ISO-AUTO.
Interestingly, this control has been renamed several times in Nikon DSLRs as the years have progressed. The test camera in this article, a Nikon D300S, calls it the ISO sensitivity auto control. Your Nikon may have a slightly different name. Let’s see how the control works and what benefit you may derive from it.

FIG 1 – Enabling the ISO Sensitivity Auto Control
Figure 1 shows the Shooting Menu screens you will use to change the control’s settings. Once you have set ISO sensitivity auto control to On, you should immediately set two values, according to how you shoot:
- Maximum sensitivity
- Minimum shutter speed
Here’s some detail on these two settings.
Maximum Sensitivity
The Maximum sensitivity setting is a safeguard for you (see FIG 2). It allows the camera to adjust its own ISO sensitivity from the minimum value you set in ISO sensitivity to the value set in Maximum sensitivity, according to light conditions. The camera will try to maintain the lowest ISO sensitivity it can use to get the picture. However, if need be it can rapidly rise to the Maximum sensitivity level. This setting overrides the normal ISO sensitivity setting.

FIG 2– Setting the ISO Sensitivity Auto Control’s Maximum Sensitivity
If you would prefer that the Maximum sensitivity not exceed a certain ISO value, simply select from the list shown in image 3 of FIG 2. The Maximum sensitivity default is ISO 3200. That’s too high for my tastes since it will let the camera take the ISO sensitivity all the way up to ISO 3200 in a low-light situation. Too much noise potential for me! Maybe not for you? In any case, I set my camera to ISO 400 for the Maximum sensitivity as shown in FIG 1, image 3.
You’ll note that there are only five available settings 400, 800, 1600, 3200, and Hi 1. Whichever one of these settings you choose as a Maximum sensitivity will be the maximum ISO value the camera will use to get a good exposure when the light drops.
Interestingly, the settings in Custom setting called (often b1) ISO sensitivity step value (1/3, 1/2, 1 EV) do not control what incremental ISO numbers between these primary values can be used. I carefully setup my D300s to test this, and found that it would often use an intermediate value like ISO 640, 1100, 1250, 2000, or 2200 as the light got darker and darker. It did this whether I set Custom setting b1 to 1/3, 1/2 or 1 EV step. Just remember that you have a maximum range from ISO 400 to Hi 1 (ISO 6400) with whatever EV steps in between that the camera decides to use.
What happens when the camera reaches its Maximum sensitivity and there still isn’t enough light for a good exposure? Let’s find out.
Minimum Shutter Speed
Since shutter speed helps control how sharp an image can be, due to camera shake and subject movement, you’ll need some control over the Minimum shutter speed allowed while the ISO sensitivity auto control is turned On (see FIG 3).
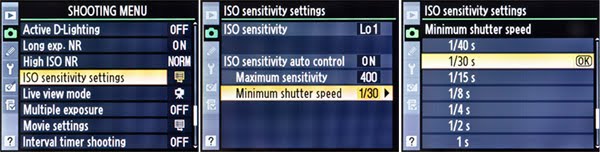
FIG 3– Setting the ISO Sensitivity Auto Control’s Minimum Shutter Speed
You can select a shutter speed from the list to set the minimum shutter speed the camera will allow when the light diminishes. In P – Programmed auto (camera controls shutter and aperture) and A – Aperture priority (camera controls shutter and you control aperture) exposure modes, the camera will not go below the Minimum shutter speed unless the Maximum sensitivity setting still won’t give you a good exposure.
This is the answer to our question in the last section about what would happen when there is not enough light and the camera has maxed out the Maximum sensitivity level. Even though you’ve selected a Minimum shutter speed, the camera will go below the minimum speed when the light is too low for a good exposure and the Maximum sensitivity ISO number has been reached.
In other words, in Programmed auto (P) or Aperture priority (A) exposure modes, if you get into low light and try to take pictures, the camera will try to keep the ISO sensitivity as low as possible until the shutter speed drops to your selected Minimum shutter speed. Once it hits the selected lowest shutter speed value—like the 1/30s shown in FIG 3, image 3—the ISO sensitivity will begin to rise up to your selected Maximum sensitivity value, like the ISO 400 shown in FIG 3, image 2.
Once it hits the Maximum sensitivity value, if the camera still doesn’t have enough light for a good exposure, it won’t keep raising the ISO sensitivity since you’ve artificially limited it with the Maximum sensitivity setting. Instead, the camera will now go below your selected Minimum shutter speed, by dropping below the 1/30s shown in FIG 3, image 3. Be careful, because if the light gets that low, your camera can go all the way down to a shutter speed of 30 seconds to get a good exposure. The camera had better be on a tripod and have a static subject at shutter speeds that low.
Look at the Minimum shutter speed value as the lowest “safe” speed after which you’ll put your camera on a tripod. Most people can handhold a camera down to about 1/60s if they are careful, and maybe 1/30s if they’re extra careful and brace themselves. Below that, it’s blur city for your images. It’s even worse with telephoto lenses. Camera movement is greatly magnified with a long lens, and a Minimum shutter speed of 1/250s to 1/500s or more may be required (max is 1/4000s).
Recent Nikons can be set to a Minimum shutter speed of Auto, which makes the camera obey the reciprocal of shutter speed rule. That rule states that you should not use a minimum shutter speed any slower than the reciprocal of the lens’ focal length. Therefore, if you have a 300mm lens on the camera you should not use a shutter speed slower than 1/300s. The Minimum shutter speed > Auto setting allows newer Nikons to obey that rule by not using a slower shutter speed than will make a sharp handheld image. That is, it will obey the rule until the light gets too low. What do I mean? Let’s find out!
For fun, let’s listen to the camera talk to itself while you take pictures in low light with ISO sensitivity auto control enabled. As we listen in on a Nikon D300(s) thinking, we need to know that the current Maximum sensitivity setting is ISO 400, and the Minimum shutter speed setting is 1/30s (as shown in FIG 3):
Nikon D300(s) thinking: “Okay, Auto ISO is on! The light is dropping and my current 1/60s shutter speed and 200 ISO sensitivity won’t let me make a good exposure. I’ll slow the shutter speed to the minimum of 1/30s, as my owner specified in my Minimum shutter speed setting. More pictures are incoming, and the light is still dropping! I can’t go any lower on the shutter speed for now, since my owner has instructed me to keep the Minimum shutter speed at 1/30s unless I can’t get a good picture. I’ll have to start raising the ISO sensitivity. Here comes more pictures, and whew, it’s getting dark! I’ve now raised the ISO sensitivity to my Maximum sensitivity level of ISO 400, which is as high as I am allowed to go. I have no choice now but to go below the 1/30s Minimum shutter speed my owner has specified. I hope I’m on a tripod!”
Special note: The other exposure modes, Shutter priority and Manual, allow you to control the camera in a way that overrides certain parts of the ISO sensitivity auto control.
- In Manual (M) mode the camera completely relinquishes all control of the shutter and aperture. It can only adjust the ISO sensitivity by itself, so it can obey the Maximum sensitivity but the Minimum shutter speed is overridden and does not apply.
- In Shutter priority (S) mode the camera can control the aperture but the shutter speed is controlled only by the camera user. So, the ISO sensitivity auto control can still control the Maximum sensitivity, but has lost control over the Minimum shutter speed.
Also, it may be a good idea to enable High ISO NR—as discussed a few pages back—when you enable the ISO sensitivity auto control. This is especially true if you leave the camera set to the default Maximum sensitivity value of 3200. Otherwise, you may have excessive noise when the light drops.
When and why should I use ISO-AUTO?
How much automation do you need to produce consistently excellent images? Let’s explore how and when automatic self-adjusting ISO might improve or degrade your images. What is this feature all about? When and why should I use it? Are there any compromises in image quality in that mode?
Normally you will set your camera to a particular ISO number, such as 200 or 400, and shoot your images. As the light gets darker, or in the deep shade, you might increase the ISO sensitivity to allow handheld images to continue being made.
If you’re in circumstances where you absolutely must get the shot, the ISO sensitivity auto control will work nicely. Here are a few scenarios:
Scenario # 1: Let’s say you are a photojournalist and you’re shooting flash pictures of the president as he disembarks from his airplane, walks into the terminal, and drives away in his limousine. Under those circumstances, you will have little time to check your ISO settings or shutter speeds and will be shooting in widely varying light conditions.
Scenario # 2: You are a wedding photographer in a church that doesn’t allow the use of flash. As you follow the bride and groom from the dark inner rooms of the church, out into the lobby, and finally up to the altar, your light conditions will be varying constantly. You have no time to deal with the fluctuations in light by changing your ISO, since things are moving too quickly.
Scenario # 3: You are at a party, and you want some great pictures. You want to use flash, but the pop-up Speedlight may not be powerful enough to reach across the room at low ISO settings. You really don’t want to be bothered with camera configuration at this time, but still want some well exposed images. Light will vary as you move around the room, talking and laughing, and snapping pictures.
These scenarios are excellent environments for the ISO sensitivity auto control. The camera will use your normal settings, such as your normal ISO, shutter speed, and aperture until the light will not allow those settings to provide an accurate exposure. Only then will the camera raise the ISO or lower the shutter speed to keep the camera functioning within the shutter/aperture parameters you have set.
Look at ISO AUTO as a “failsafe” for times when you must get the shot, but have little time to deal with camera settings, or when you don’t want to vary the shutter/aperture settings but still want to be assured of a well exposed image.
Unless you are a private detective shooting handheld telephoto images from your car, or are a photojournalist or sports photographer who must get the shot every time regardless of maximum quality, I personally would not recommend leaving your the ISO sensitivity auto control set to On. Use it only when you really need to get the shot under any circumstances!
Of course, if you are unsure of how to use the “correct” ISO for the light level, due to lack of experience, don’t be afraid to experiment with this mode. At the very worst, all you might get are noisier than normal images. However, it may not be a good idea to depend on this mode over the long term, because noisy images are not very nice.
Are there any drawbacks to using ISO-AUTO?
Maybe! It really depends on how widely varying the light conditions will be when you are shooting. Most of the time your camera will maintain normal ISO range settings in ISO-AUTO so your images will be their normal low-noise, sharp, masterpieces. However, at times the light may be so low that the ISO may exceed the “normal” range of 200-800, and will start getting into the noisier ranges above 800 ISO.
Just be aware that the ISO sensitivity auto control can and will push your camera’s ISO sensitivity into a range that causes noisier images when light levels drop, if you’ve allowed it. Use it with this understanding and you’ll do fine. ISO 3200 is the maximum, unless you have set the maximum to a lower number. Make sure you understand this, or you might get some noisy images.
The ISO sensitivity auto control is yet another feature in our powerful Nikon cameras. Maybe not everyone needs this “failsafe” feature, but for those who do it must be there. I will use it myself in circumstances where getting the shot is the most important thing, and where light levels may get too low for normal ISO image making.
Even if you think you might only use it from time-to-time, do learn how to use it for those times. Experiment with the ISO sensitivity auto control. It’s fun and can be useful!
Keep on capturing time…
Darrell Young
See my Nikon books here:
http://www.PictureAndPen.com/NikonBooks.asp
Good info. Lucky me I ran across your blog by chance
(stumbleupon). I’ve saved it for later!
thanks . i use it most of the time in all modes workes great..i just need to keep a eye on my shutter speed
Hi Darrell, I have your “Mastering the Nikon D500” book and, along with a lot of experience with that and previous Nikon camera bodies, feel I have a pretty good grasp on how to use ISO Sensitivity Control. However, in the last few months I’ve noticed unexpected EXIF info on shots where I used ISO Sensitivity Control. For example, I was shooting flying owl photos last weekend and had ISO set to 400, Aperture set to f5.6, and set ISO sensitivity control so that it would increase to as much as 12,800 if my shutter speed dropped *below* 1/1000s, and I was shooting in Aperture Priority. I looked at my images later and saw I had fantastic a shutter speed of 1/5000s in several of them. OK but then I saw that my ISO had increased to 1250 in those shots too! Now why in the heck would it do that, if my ISO sensitivity control shutter speed threshold was 1/1000s? I can’t figure this out, it doesn’t make sense. I don’t recall seeing this happen with my old D7100, ever, and I had it set up identically. If it makes any difference at all, I was in the highlight-weighted metering mode on my D500. Thanks in advance for help understanding this, I’m stumped!