I suspect that the rule of thirds gets more screen time than about any other photography rule, and for good reason. It takes away the blandness in many images, adding a dimension of visual interest to a common subject.
The rule of thirds is not difficult to use, taking only a little extra thought about how to best compose the image using the concept. Let’s discuss the rule of thirds in a little more detail and see how you might best use it to enliven your photography.
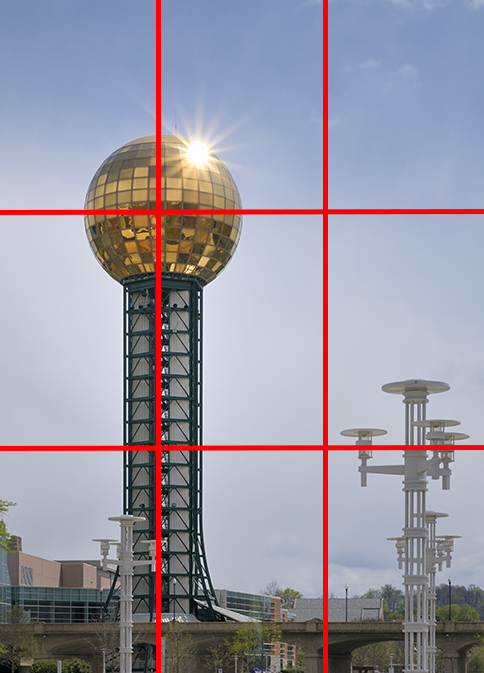
Figure 1: Image divided into thirds and main subject placed on conjunction point
First, a simple explanation of the rule of thirds. The red lines in figure 1 represent a visual division of the image into thirds. In this image of the Sunsphere from the 1982 World’s Fair in Knoxville, Tennessee, USA, you can see how I positioned the tower and Sunsphere on thirds in the image, with the tower running up the left third of the picture and the subject, the interesting Sunsphere with the sun reflecting from it, placed on the junction of the top and left third of the image.
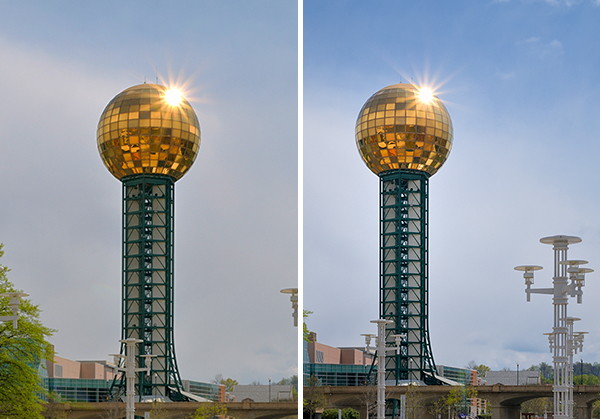
Figure 2: Comparing images with and without rule of thirds
In figure 2 are two similar images, one using the rules of thirds to the max and one using part of the rule of thirds. Which image seems more interesting to you (cover one and the other with your hand while viewing)?
The rule of thirds is a rule that can be beneficial but is not an absolute rule. You can break it if you feel like it. However, many people find subjects centered in the frame somewhat boring. Your eye instantly sees the subject in the middle of the frame and doesn’t usually investigate the image any further. When using the rules of thirds, the eye often finds the main subject and then looks around the image for other interesting points. This has been studied for literally hundreds of years in painting and now in photography.
History of the Rule of Thirds
The rule of thirds has a long history, stretching back to painters in the shadows of time past. Even before it was given a name, it was a recognized technique to add interest to paintings.
The person who gave the technique a name was a fellow who lived back in the 1700s named John Thomas Smith. He wrote a book called Remarks on Rural Sceneryin which he quotes from a work done in 1783 by Sir Joshua Reynolds. Reynolds discusses the balance of dark and light in a painting. Smith uses that idea, expanding on it and giving it a name for the first time, the “Rule of thirds” (figure 3).
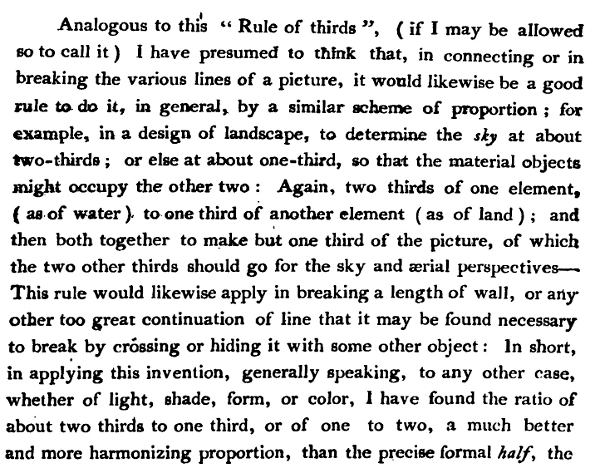
Figure 3: Excerpt from John Thomas Smith’s book, Remarks on Rural Scenery, published in 1797
It is quite interesting how we have taken rules first used in paintings and now applied them to photography, isn’t it. When you think about it, though, what is photography other than painting with light? The old painting masters imitated how light falls on a subject to make it look realistic and beautiful. We get to work with actual light, shapes, and angles in our photography. The rule of thirds is actually quite a valuable tool and I encourage you to use it if you haven’t been, so far.
Landscape Photography Using the Rule of Thirds
John Thomas Smith is basically describing the techniques that many landscape and scenic photographers use to balance their images for maximum interest. If one places the horizon about on third, or two thirds, of the way into the picture, it adds visual interest. Letting the horizon go right down the middle of the image takes away from that visual spice.
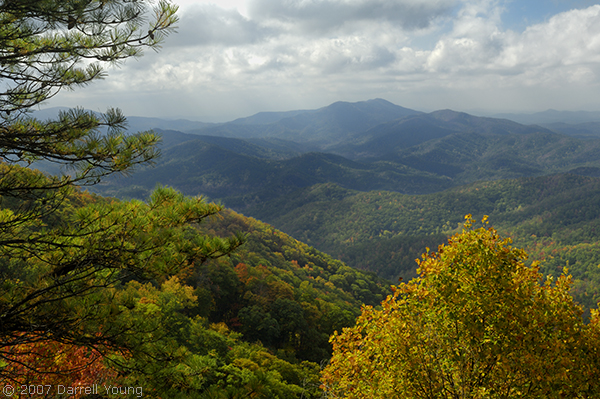
Figure 4: Using John Thomas Smith’s Rule of Thirds concept in a landscape image
In figure 4 is an example of an image taken with the foreground taking up about two thirds of the image and the sky using the last third. Also, there are interesting foreground elements (trees) adding depth to the image, while also using the rule of thirds for placement in the frame.
These techniques are not hard to do. It just takes a little thought and experimentation with composition. Instead of just running up to a pretty scene and snapping off the first shot you see, why not take some time to position the elements in the picture in a more interesting way, by using the rule of thirds.
After some time has passed with you trying to use the rule of thirds, it will become almost automatic. No more will you just snap off a shot, instead you will look for elements to put in the thirds positions to either be the main subject or support the subject.
Portrait Photography Using the Rule of Thirds
Many times, when you place a person directly in the middle of the image, you are making the picture less interesting than it could be. When taking portraits of people, it is often much better to use the rule of thirds, placing the subject’s face on or near one of the junction points in the image, when possible.
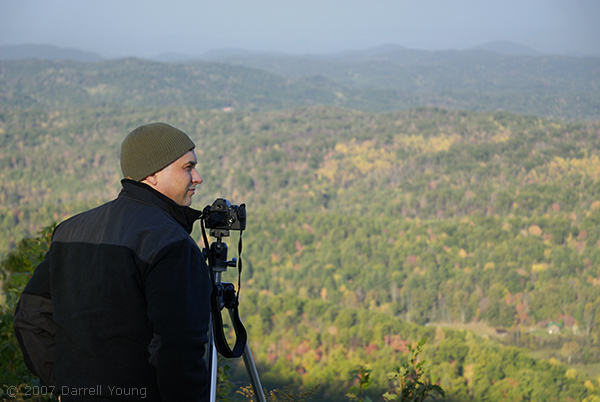
Figure 5: Using the rule of thirds in a portrait
In figure 5, which is really just a snapshot of a friend of mine one day while shooting landscapes in North Carolina, USA. This is an example of how the rule of thirds can add a certain dimension to even basic photography. Notice how my subject’s face is about on a junction point of the left and top half of the frame and his body is on the one third line.
Also notice how the subject is looking out of the frame, and there is negative space on the right side of the image. This makes the viewer wonder what the subject is looking at. This is a technique called “breathing space”, which is something that the rule of thirds allows. It makes visual interest to add space on the side of the image the subject is looking at. The right two thirds of the image is basically out of focus and subjectless. However, it still provides a backdrop to an image that tells a story of a photographer on a cool fall day, on top of a mountain, gazing into the distance while enjoying the beauty in nature.
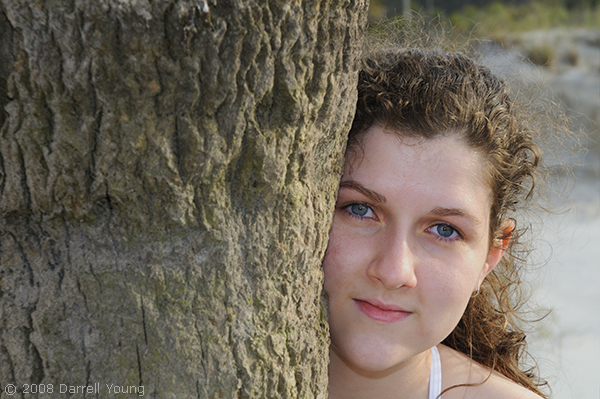
Figure 6: Sweet daughter portrait using rule of thirds
In figure 6, I again use negative space to add interest to the image. My daughter’s face is occupying the right third of the image, while the left two thirds are simply showing a palm tree she’s peeking from behind. See how simple the rule of thirds is to implement? Had I not used the rule of thirds and placed her face smack dab in the middle of the image, the entire right side of the image would be a dead area with nothing but out of focus background. Since no one is looking into that background it would hold absolutely no interest and would tend to make the image look rather boring.
Use the Rule of Thirds Today
Making a decision about how to position things properly is the basis of the rule of thirds. You can implement this concept today in your own photography.
Sometimes, the simplest things, like the rule of thirds, can make your photography better than before. Just a simple shift of the camera, and a little extra thought about composition, can turn an average image into a much more interesting one. Make your images tell stories by using this well-established photography technique.
Keep on capturing time…
Darrell Young

Darrell Young is an active member of the Nikonians User Community, Nikon Professional Services (NPS), Professional Photographers of America (PPA), North American Nature Photography Association (NANPA), and the author of 24 photography books from NikoniansPress and Picture and Pen Press, through Rocky Nook. You may review a few of Darrell’s Nikon books here. He has been an avid photographer since 1968 when his mother gave him a Brownie Hawkeye camera.
This website was created to support the readers of his educational books, photography students, and clients. Visitors to this website will find articles and reviews designed to inform, teach, and help you enjoy your photographic journey.
Nice post. Next time you are at the Sunsphere walk over to the Holiday Inn and order the Tennessee Whiskey Burger…..makes my cardiologist plan his next trip but wowsers. It’s an hour drive for me (Rogersville) but that may be a good thing lol.
Hi Darrell,
Another great post!
I’ve got a question. Given that the rule of thirds is so well known why does Nikon’s grid view split the view finder into quarters? Surely splitting it into thirds to match the rule of thirds would make much more sense. I don’t suppose there’s a way to control it is there ? (I’m using a D750)
Thanks
Paul
Paul, I and many others have thought the same thing as you. However, the grid display is set in stone and cannot be modified.