Beginning with firmware version C2.00, Nikon added eye detection to the Nikon Z7 camera. You can download the firmware update and instructions for installation at these Nikon web addresses:
Nikon Z6: http://bit.ly/2kieWxT
Nikon Z7: http://bit.ly/2m0MSzt
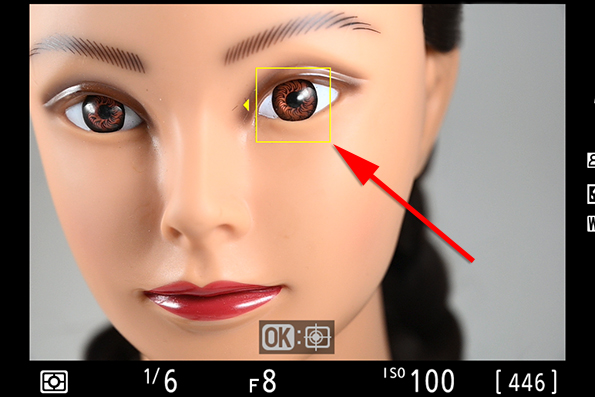
Eye-AF is available only when using the Auto-area AF function and when the camera is in Photo mode; it will not work in Movie mode. When Eye-AF is enabled, the camera notifies you that it has detected a human eye by surrounding the eye with a yellow square (figure 1.0, red arrow). The eye detection square can be manually moved to a different eye on your subject, or to an eye on a nearby subject, such as when you are photographing a group of people. This enables you to select the sharpest focus for a particular eye of the most important subject.
To use this powerful new feature, we first need to enable Eye-AF (eye detection) in the Custom Setting Menu.
Enabling Eye Detection
Eye detection is an optional setting. However, for most of us, it’s a good idea to leave it enabled since it will not interfere when photographing a non-human subject. Once enabled the Eye-AF frame (figure 1.0) will appear when the camera can detect human eyes. Let’s examine how to enable or disable Eye-AF.
Use the following steps to enable or disable eye detection (Eye-AF):
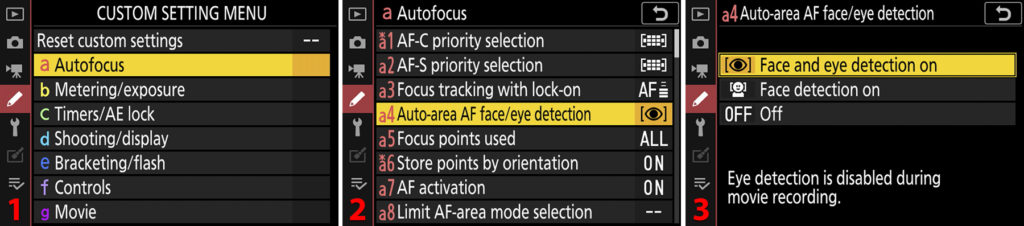
- Choose a Autofocus from the Custom Setting Menu (figure 1.1, image 1).
- Select a4 Auto-area AF face/eye detection from the a Autofocus menu (figure 1.1, image 2).
- Highlight Face and eye detection on and press the OK button (or touch the item with your fingertip). You have now enabled both face and eye detection.
Next, let’s examine how to select Auto-area AF mode so that you can use the Eye-AF functionality within your camera.
Selecting Auto-area AF Mode
Please review the various AF-area modes starting on page 89 of Mastering the Nikon Z7. Each AF-area mode has a particular purpose. The mode we are considering in this document is Auto-area AF since it is the only mode (currently) that provides Eye-AF. Let’s see how to select Auto-area AF.
Follow these steps to select Auto-area AF mode so that you can use Eye-AF:
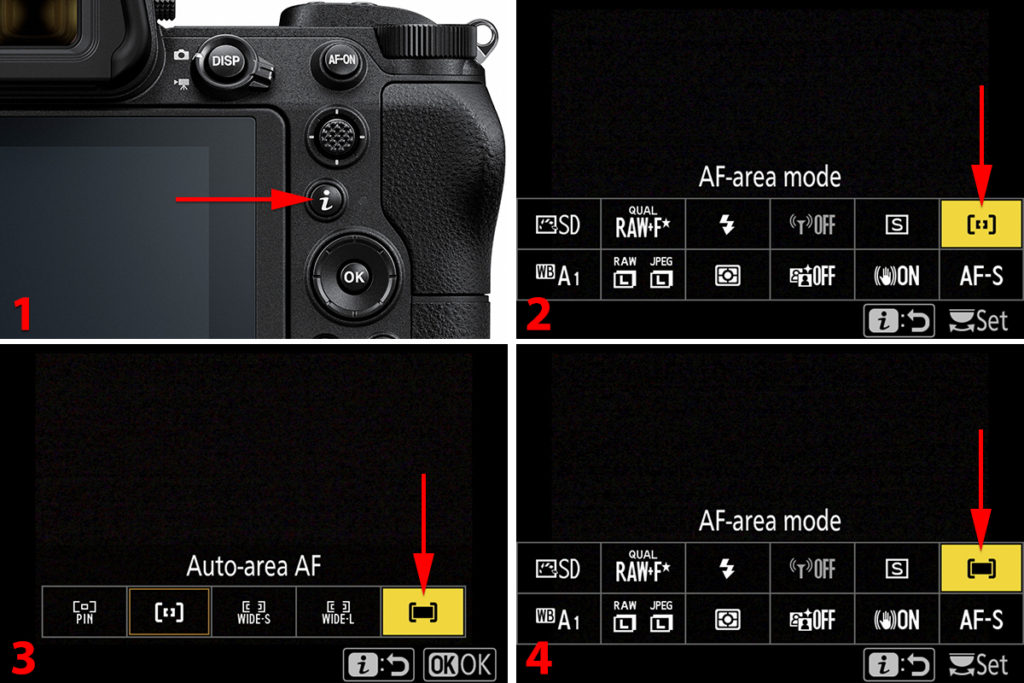
- Press the i button on back of the camera to open the iMenu (figure 1.2, image 1).
- Scroll over to the AF-area mode choice on the top right of the iMenu (figure 1.2, image 2). Press the OK button or touch the AF-area mode symbol.
- The AF-area mode submenu will open, with several choices. Highlight the last choice, Auto-area AF (figure 1.2, image 3). Press the OK button or touch the Auto-area AF mode symbol.
- The camera will return to the original iMenu screen, with Auto-area AF selected. You are now ready to start using Eye-AF (figure 1.2, image 4).
Let’s examine how to use face and eye detection.
Using Eye Detection in Auto-area AF Mode
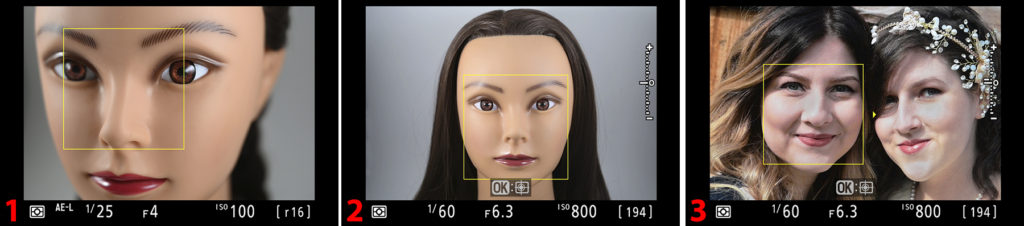
With non-human subjects—when you are using Auto-area AF—the camera takes control and autofocuses on what it thinks is the most appropriate subject. When you have face or eye detection enabled, the Z7 gives special emphasis to human faces. The Eye detection square (figure 1.3) is much smaller than the face detection square.
Fortunately, you can move the Eye-AF focus square with the Sub-selector joystick or the Multi selector pad and choose a particular eye; therefore, you do have pretty good control of which face or eye the camera focuses on.
In figure 1.3, image 1, you will note that the Eye-AF square is surrounding model Lilly Mae’s left eye (on your right). Look carefully at the point of the red arrow and you will see a tiny yellow pointer pointing to her other eye. As mentioned previously, you can move the entire Eye-AF square to a different eye, or even to a nearby person’s eye, by using the Sub-selector joystick or the Multi selector pad.
If there are three or more people with their heads close together (group shot) and you are currently focusing on the middle person, the tiny yellow pointer will appear on both sides of the Eye-AF square. This signifies that the camera has detected people’s eyes on either side of the current subject’s eyes. This gives you a lot of flexibility in choosing your best subject.
Simply scroll to the eye that you want to receive the best focus and then control how deep focus is front-to-back with the aperture size, using depth of field. Review: A small aperture gives deeper focus front to back while a large aperture gives shallower focus. By using depth of field, you can make sure that not only the eyes but also noses and even ears are in focus, or not.
In figure 1.3, image 2, I have moved the Eye-AF square to Lilly Mae’s right eye (on your left). Notice how the tiny pointer is now pointing at her left eye, in case you decide to focus on it again.
In figure 1.3, image 3, I have pressed the shutter release button half-way down to lock focus. The focus-lock was available because I was using AF-S Focus mode. The green color of the Eye-AF square in image 3 means that the focus is locked on Lilly Mae’s eye and will stay locked as long as I hold pressure on the Shutter-release button (or AF-ON button). When AF-S Focus mode is in use and the focus is locked (green square), autofocus is not being updated and won’t be until you release and repress the shutter release button halfway (or the AF-ON button all the way). If your subject moves, the camera’s focus may not be accurate.
Had I been using AF-C Focus mode, the focus would not have locked and the Eye-AF square would have remained yellow. With AF-C Focus mode, the camera will continuously update the focus on the detected eye and even jump to a different eye if the Z7 deems appropriate. Hold the camera still at the moment of exposure to prevent the Eye-AF square from moving to a different eye.
Here is a summation of how the focus modes affect the Eye-AF square and its functionality:
- When using AF-S Focus mode: The yellow Eye-AF frame will turn green when the camera achieves good focus, and focus will lock while you hold down the Shutter-release button halfway or the AF-ON button all the way. If you want to update focus you must use the Shutter-release or AF-ON button again.
- When using AF-C Focus mode: The focus frame will remain yellow while you are holding down the Shutter-release or AF-ON buttons. The focus will notlock when good focus is acquired because the focus frame seeks focus continuously. The camera stops updating the focus if you stop pressing the Shutter-release or AF-ON button, although the Eye-AF square will continue tracking eyes. You must maintain pressure halfway down on the Shutter-release button or full pressure on the AF-ON button in order to maintain good focus on the selected eye.
- When using MF Focus mode: Eye-AF turns off when you are using Manual Focus mode. You will need to use a normal red focus square by moving the square to a point on your subject where you need best focus. Hopefully, you will have also enabled Focus peaking.
Range of Distance for Accurate Eye-AF
Eye-AF is available only within a certain range. If you get too close to your subject or too far away, Eye-AF becomes disabled and the camera reverts to using Face detection instead of Eye detection.
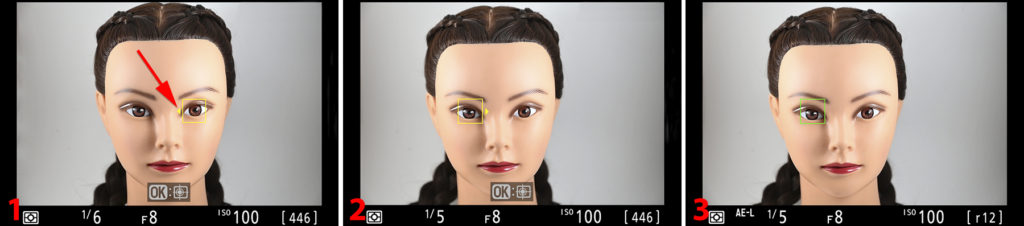
In figure 1.4, image 1, I have moved the lens to within a few inches of Lilly Mae’s face. Eye-AF became disabled and Face detection mode kicked in.
In figure 1.4, image 2 and 3, you see a simulation of what happens when you get too far away from your subject. Eye-AF will become disabled when the subject is too far away from the camera for Eye detection to work efficiently. You will see the larger yellow Face detection square when you are too far away (or too close) for Eye-AF to work.
In my experience, when using a Nikkor Z 24-70mm F/4 S lens, the camera can maintain Eye-AF out to about 10 feet (3.0 meters) if zoomed to 70mm. When not zoomed all the way out, the range will vary from 4 to 6 feet (1.2 to 1.8 meters).
Keep in mind that Eye-AF distance is completely variable. If you are using a 200mm lens, for instance, of course you will be able to stand much farther away and get good Eye-AF performance. I suggest that you test the Eye and Face detection system with your current lenses so that you will develop a feel for the minimum and maximum distances you can use.
Check the resulting pictures when you are shooting at the ragged edges of Eye-AF capability to make sure that Eye and Face detection are working well enough for you. You may want to increase depth of field by using a smaller aperture (e.g., f/5.6 to f/8) for groups shots when you are using Eye-AF at the edges of its range capability.
Summary
The new Eye detection (Eye-AF) in the Nikon Z7 is efficient and easy to use. As time goes by, future firmware updates will likely increase the capability of the Eye-AF feature. These new mirrorless Nikons open the way for frequent firmware updates that add and improve the cameras features.
Let’s hope that Nikon continues to make full use of firmware updates, giving us new and improved goodies for our tiny, mirrorless powerhouse cameras!
Please Consider My New Books
This article is an excerpt from my two new books, Mastering the Nikon Z6 and Mastering the Nikon Z7. Please use my coupon code YOUNGRN40 at checkout to get a 40% discount on either of my books. My publisher offers a printed and ebook bundle (with three ebook formats for maximum compatibility). Here are links to both books:
Mastering the Nikon Z6: http://bit.ly/2lEe6LR
Mastering the Nikon Z7: http://bit.ly/2lDFKbP
Thank you for considering my books and reading my articles!
Keep on capturing time…
Darrell Young

Darrell Young is an active member of the Nikonians User Community, Nikon Professional Services (NPS), Professional Photographers of America (PPA), North American Nature Photography Association (NANPA), and the author of 24 photography books from NikoniansPress and Picture and Pen Press, through Rocky Nook. You may review a few of Darrell’s Nikon books here. He has been an avid photographer since 1968 when his mother gave him a Brownie Hawkeye camera.
This website was created to support the readers of his educational books, photography students, and clients. Visitors to this website will find articles and reviews designed to inform, teach, and help you enjoy your photographic journey.
Join Darrell on Facebook, Instagram, and Twitter
Copyright © 2019 Darrell Young, All Rights Reserved