Many advanced to semi-pro Nikons—with pop-up Speedlight flash units—have a flash Commander mode, with full Nikon Creative Lighting System (CLS) technology built right into the camera. In Commander mode, the camera can function as a controller for multiple Nikon Speedlight flash units.
You can use normal i-TTL flash technology with the camera’s built-in flash for single-flash usage or Commander mode and the built-in flash to control up to two groups of an unlimited number of external Nikon Speedlight flash units. Nikon currently makes the powerful SB-910 flash unit, along with its slightly less powerful SB-700 brother, and smaller specialty Speedlight units, such as the SB-R200.
Many of us have an external flash unit or two—usually the SB-910, SB-900, SB-800 (now discontinued), SB-700, SB-600, or SB-400 (not CLS compatible). The specialty SB-R200 flash unit is designed to be used on various brackets available from Nikon and will work in conjunction with the bigger Speedlight flash units. A Nikon having Commander mode allows you to arrange professional lighting setups using relatively inexpensive and very portable Speedlights.
What Is Commander Mode and How Does It Work?
Commander mode is controlled through a menu in your Nikon. If you examine the Commander mode screen shown in figure 1, you’ll note that you have controls for the built-in flash and two groups (A and B), or banks, of external flash units. You’ll also see that you can set exposure compensation for either of these.
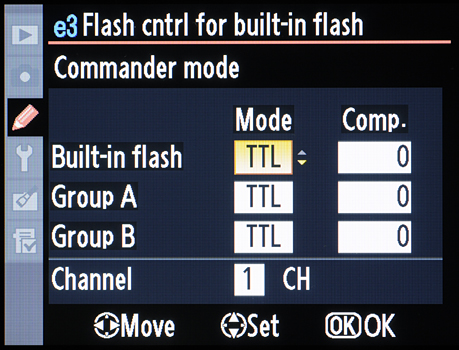
Figure 1 – Commander mode
If the main flash is too bright, you can either move it farther away or dial its power down by setting compensation (exposure comp.) to underexpose a little. You can set compensation in 1/3-stop increments, so you have very fine control of each group’s flash output. The point is that you can experiment until you get the image just the way you want it. Sure, you could do things the old way and use a flash meter or get your calculator and figure out complex fill ratios. Or, you can simply use CLS to vary your settings visually until the image is just right.
Isn’t it more fun to simply enter some initial settings into your Commander mode screen and then take a test shot? If it doesn’t look right, change the settings and do it again. Within two or three tries you’ll probably get it right, and you will have learned something about the performance of your Creative Lighting System. In a short time you’ll have a feel for how to set the camera and flash units and will use your flash/camera combo with authority.
Note: If you leave Custom setting Menu > e Bracketing/flash > Modeling flash set to the factory default of On, you can test-fire your single Speedlight’s—or all speedlights in Group A and B’s— built-in modeling light by pressing and holding the camera’s Depth-of-field preview button.
Using Commander Mode
Let’s start by putting your camera into Commander mode. We’ll do that by changing Custom Setting Menu > Bracketing/flash > Flash cntrl for built-in flash to Commander mode (CMD). Look at figure 2 for the screen series to set this option.
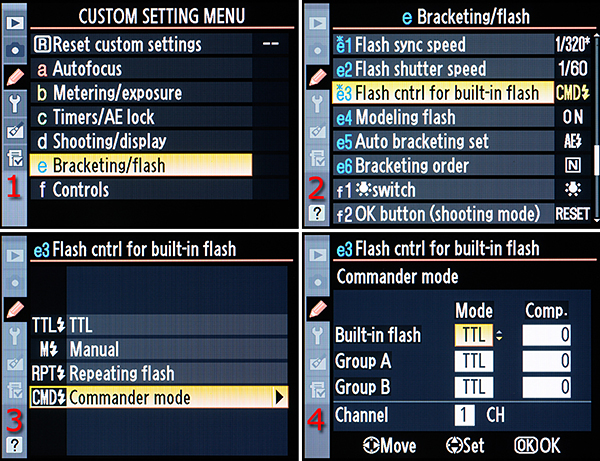
Figure 2 – Setting the camera to Commander mode
Since this article is about controlling multiple flash units, we’ll have to change the settings in the Commander mode screen, as shown in figure 2, image 4. We’ll examine each of the settings available under the Commander mode.
TTL is the easiest to use since it allows you to set exposure compensation for the built-in flash as well as each of your flash groups. Next, we’ll look at M mode, since that gives you fine control of your flash from full-power (1/1) to 1/128 power. We’ll briefly look at AA mode. Then finally, we’ll consider the – – (double-dash) mode, which prevents the camera’s built-in flash from firing the main flash output but does not stop the necessary monitor pre-flashes, nor the firing of the external flash units.
When your camera is controlling external Speedlights using its built-in Commander mode, you must always raise the built-in flash on your Nikon. The camera communicates with the external flash units during the monitor pre-flash cycle.
Always position the sensor windows on the external Speedlights where they will pick up the monitor pre-flashes from the built-in flash. Take particular care when not using a tripod.
Commander Mode Settings
Basically, the Mode fields on the Commander mode screen will display the selections listed below. Use the Multi Selector thumb switch to change the values, as shown in figure 3.

Figure 3 – Commander mode screen
Here are the four Commander mode settings:
- TTL, or i-TTL mode
- AA, or Auto Aperture mode
- M, or Manual mode
- – –, or double-dash mode (what else would one call it?)
You’ll find each mode in the Mode box shown in yellow in figure 3. Use the Multi Selector thumb switch to scroll up or down and select a mode. AA mode is not available for the Built-in flash, so you will only see AA in the Mode boxes following Groups A and B. Now, let’s examine each mode in more detail:
TTL Mode – The TTL setting allows you to use the full power of i-TTL technology. By leaving Mode set to TTL (as shown in figure 3) for the Built-in flash or Group A or B, you derive maximum flexibility and accuracy from all your flash units. In this mode, the Comp. setting will display exposure values from -3.0 EV to + 3.0 EV, a full 6-stop range of exposure compensation for each group of Speedlights. You can set the Comp. in 1/3 EV steps for very fine control.
AA Mode – I am only briefly touching on the AA mode, since it is an older non-i-TTL technology included for those accustomed to using the older technology. It is not available for the built-in Speedlight on the Nikon, or for the SB-600. You can safely ignore the AA mode, unless you want to experiment with it. It may not provide as accurate a flash exposure as TTL mode though, since it is not based on the amazing i-TTL technology. Otherwise, it works pretty much the same as TTL mode.
M Mode – This allows you to set different levels of flash output in 1/3 EV steps for the Built-in flash or the Speedlights in Group A or B. The settings you can put in the Comp. field are between 1/1 (full) and 1/128. The intermediate 1/3-stop settings are presented as decimals within the fractions. For example, 1/1.3 and 1/1.7 are 1/3 and 2/3 stops below 1/1 (full). Many people are used to working with flash units this way, so it seems more familiar. CLS is willing to oblige those experienced in working manually.
– – Mode (double-dash mode) – The built-in Speedlight will not fire the main flash burst in this mode. It will fire the monitor pre-flashes, since it uses them to determine exposure and communicate with the external flash groups. Be sure you always raise the camera’s built-in flash in any of the Commander mode modes; otherwise, the external flash groups will not receive a signal and won’t fire their flashes. When you set the Mode for Group A or B to double-dash (– –) mode, that entire group of flashes will not fire any flash output. You can use this mode to temporarily turn off one of the flash groups for testing purposes.Since the built-in flash’s monitor pre-flashes always fire, be careful that they do not influence the lighting of your image. Use a smaller aperture, or move the camera farther away from your subject if the pre-flashes add unwanted light.
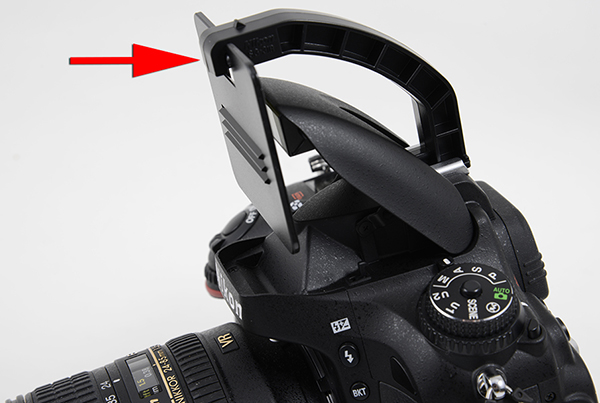
Figure 3A – The Nikon SG-31R IR panel in front of the pop-up flash (Nikon D600)
Or, you could acquire the Nikon SG-31 IR panel (figure 3A), which passes only infrared light to the external flash unit’s IR ports. This prevents the pop-up flash unit from adding light to the picture while still allowing it to control the two groups of external Speedlight flash units during its monitor preflash cycle.
What Are Monitor Preflashes?
When you press the Shutter-release button with the pop-up flash open, the camera’s built-in Speedlight fires several brief preflashes and then fires the main flash burst. These preflashes fire whenever your camera is set to TTL mode, even if your Nikon is controlling multiple flash units through CLS. The camera can determine a very accurate exposure by lighting your subject with a preflash, adjusting the exposure, and then firing the main flash burst.
Setting the Channel (CH) for Communication
Look at Figure 4, or your camera’s Commander mode screen, and you’ll notice that just below Group B there is a Channel (CH) selection. The number 3 that I selected in the yellow Channel (CH) box is the communication channel your Nikon expects to use to talk to the external flash groups (factory default is 1).
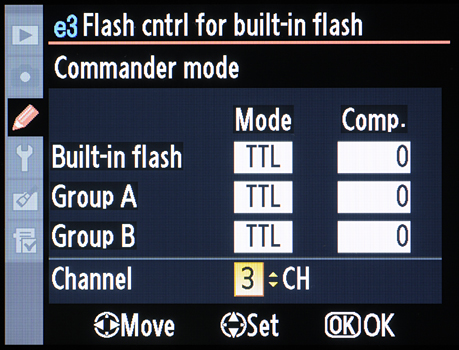
Figure 4 – Commander mode – Channel of communication
There are four channels available (1–4), just in case you happen to be working in the vicinity of another Nikon user who is also using Commander mode. By using separate channels, you won’t interfere with each other.
Note: It is important to realize that all external flashes in all groups must be on the same channel. This involves setting up your individual flash units to respond on a particular channel. They might be in separate groups but must be on the same channel. Each external Speedlight flash will have its own method for selecting a Group and Channel. Refer to the flash unit’s user’s manual.
Learning to use Commander Mode and Nikon’s Creative Lighting System will enable you to set up complex lighting arrangements with much less effort than in previous years. Use your Nikon and its Commander Mode to become a real lighting technician.
Keep on capturing time…
Darrell Young
See my Nikon books here:
http://www.PictureAndPen.com/NikonBooks.asp
I have the Nikon D600. I also have a Promaster 7500EDF Digital flash. I was able to use the command mode on my camera in manual flash. I went to a workshop and the teachers had a trigger to operate their flashes. They had me try their flash and triggers on my camera and now I am unable to get my camera to operate in manual or TTL modes in commander mode. My flash will work in AA mode (off camera) only. Can you tell me what happened and if I can fix this?
Thank You
I have the Nikon D810 and i was trying to fire the off camera flash but the built in flash keeps firing, is it supposed to do that?
Yes ; see this bit ..– – Mode (double-dash mode) – The built-in Speedlight will not fire the main flash burst in this mode. It will fire the monitor pre-flashes, since it uses them to determine exposure and communicate with the external flash groups.
Yes. Just dial down the flash exposure to the lowest level. The light from the on-camera flash fires the off-camera flash.
I know you wrote this a while ago, but this was super helpful. Thanks!
Do I have to use the SG-3IR with the built in commander in OFF mode with D810 ?
Having used studio lighting ; Elinchrom / Bowens / Strobe during my 30 yr career..I rarely use
speedlights..however new projects have dictated that I now use them..they have always been a dark art
to me ESPECIALLY the very confusing menu on my SB800’s ( which I still can’t fathom) This post I have found very very useful Thankyou.
Hey, I have the d810 and using an-5000, I have obviously hit a button but it now takes two photos, not always but most of time and by looks of it ones is couple of exposure steps under the other
Darrell, I need help! I bought a pixel flash that is remote and I have a Nikon 810 I simply can’t figure out how to make the flash work it will focus but not work the shutter release.
Thank you thank you
Darrell, I need help! I bought a pixel flash that is remote and I have a Nikon 810 I simply can’t figure out how to make the flash work it will focus but not work the shutter release.
Thank you thank you
Hi Darrell,
People like you are really great help to learners like me.
This worked well especially with the penal
Thank you,